Two-part One-shot
SPOLIERS BELOW, ME HEARTIES! Turn back now if you want to be a player in the Derelict!
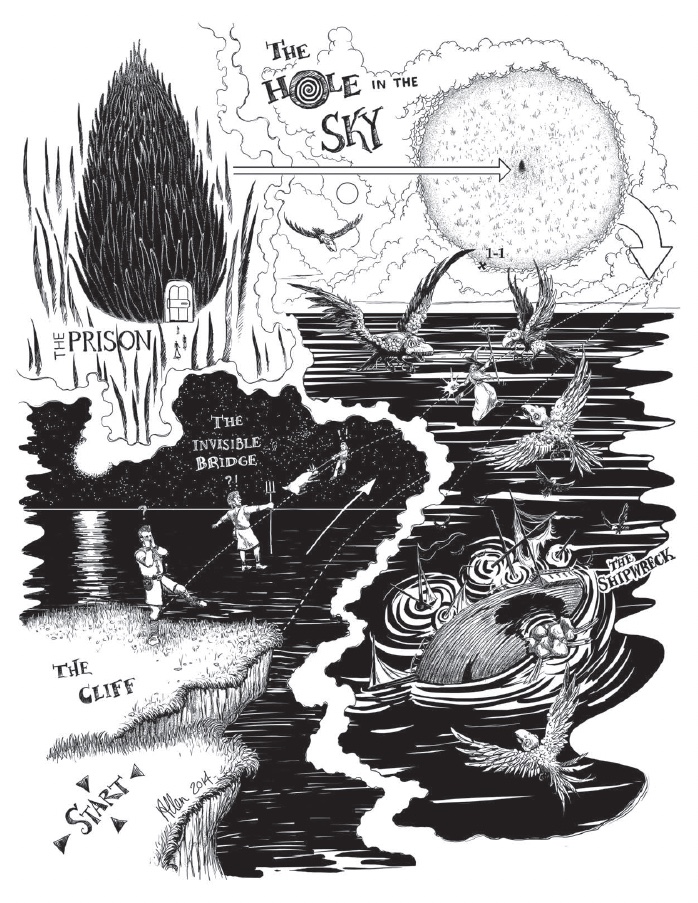
You know how it is, dear reader, when you board your luxury yacht and expect to make excellent time crossing the North Atlantic? And then you start to run into complications? Almost everyone gets drunk, you come across a seemingly abandoned reefer ship washed up on an iceberg, you decide to explore the possibility of rescuing anyone from it or maybe even salvaging it for vast profits, you board it and find its covered in blood and the controls have been deliberately sabotaged, you’re hunted by a towering monstrosity with a crystalline bow and only one weird leg, which is visible only to about half of your number, your own yacht’s controls are smashed to bits and the captain is eviscerated and several of your number begin to lose their grip on sanity?
Of course you do! Anyway, when I write it out like that, quite a lot did happen in the first session of the Derelict. It took so long, in fact, that we had to stretch it to two. We played it out in about five hours in total, I’d say, but there was plenty left undone as far as this scenario goes. You could easily stretch it out to three sessions of three hours each, I’d say.
The Scenario

In this post from about a month ago I introduced the premise of the Call of Cthulhu scenario I ran as part of our Tables & Tales October Event, during which we ran a bunch of horror/spooky/halloween themed games especially for our newbies. Today, I’m going to look at how it went and how I think it could have gone better.
The Derelict is a 28 page adventure for Call of Cthulhu. It appears in Petersen’s Abominations, published in 2015 by Chaosium. It was written by Sandy Petersen with Mike Mason.
It seems Petersen got the idea for this adventure while reading about Viking explorers and this particular encounter that was described quite matter-of-factly as a Sciapod, a one-legged creature with a crystal bow. The conceit is that such creatures were not necessarily taken as supernatural by people of by-gone ages so the encounter was recorded as a relatively mundane occurrence. I like that this theme jibes with Zedeck Siew’s observations about the attitude many Malaysians would have to signs of the Pontianak in his scenario, A Perfect Wife, as well as my own personal experience of growing up in Ireland. Of course, when the Investigators encounter the Sciapod in the Derelict, they are not likely to react the same way at all.

The Derelict was clearly designed as a one-shot or very short campaign. It would be hard to work it into an ongoing campaign, I think, given the rarefied circumstances and setting, so if you want to run it, I would suggest taking it at face value and go for something short and self-contained. I would also recommend using the pre-generated characters. They are all rich/famous arseholes of one stripe or another. You know, the type of people you would expect to have on a luxury yacht. But they also have their own motives, some are having money troubles, some are looking for sponsors, some are party animals, that sort of thing. They are relatively well painted and designed to be easy to pick up and play. There is a second option presented in the scenario: the PCs could be members of a rescue team sent to investigate the Derelict, but this option lacks the horror movie energy you get from the rich yachters, in my opinion.
The formatting is useable and fairly presentable. It starts with the intro and a brief description of our cast of characters before a short section on Starting the Scenario, under which we also get a useful Sequence of Events. I say “useful,” but my players exited the sequence pretty quickly and I was forced to improvise liberally from that point on.
The bulk of the scenario is taken up with descriptions of the main areas of the Derelict ship and the iceberg it’s stuck on. It does go into a fair amount of detail even about the areas that are of little or no interest. It will tell you where to find the clues and items of interest within these descriptions. This is the greatest weakness of the adventure, to be honest. My players spent almost no time exploring the ship. They were incredibly goal oriented, going to Engineering to find things to help them fix their own boat and to the radio room for a way to contact someone. So, they didn’t find the book of norse legends, the handwritten notes that presented possible ways to defeat the Sciapod, the silver items that would allow people to actually see the creature, etc, etc. I wish I had started just transplanting some of the more important clues and things to the rooms they did explore earlier. In the end, I did do that but we had played the bulk of the game by then.
It has some great maps and illustrations throughout. The maps of both boats were particularly useful. We were playing on Roll20. So I used the maps a lot. In the first session I used fog of war on the map of the Derelict, but I found this led to too much player confusion about the location of everything and too much time spent by me on descriptions. It was supposed to be a one-shot! So, in the second session I turned off fog of war under the pretence that they found a full map in Engineering. That made things a lot easier. The players were able to see where they might want to explore and they started to do that.
One of the strengths of this scenario is that, even though it provides you with a sequence of events, it encourages you to play it quite free-form. Simply allow the PCs to look around, discovering clues as to what happened here and maybe how to defeat the monster, and then start picking off characters with the Sciapod as they go, NPCs first. They’ll start getting injured and insane and the scenario should blossom from that. In many ways, this is what led to our game going quickly off the rails. The sequence of events expects the players to start trying to find ways to kill or drive off the Sciapod but that’s not what happened at all. As I started to kill them off and ship away at their sanity, they began to look only for alternative ways of escape. But, of course, along the way they saw some some pretty disturbing things and one of them lost the plot completely, going full axe-murderer before eventually getting it together while they all bundled into the last remaining lifeboat. Except for looking for firearms on board, they never considered finding a way to kill it. And, of course, this was great! I loved it and the players had fun. But I will admit to, at times, trying to get them to take the route that was expected of them. I think I would have had more fun if I had lust loosened my grip on the reins a bit more.
Still, if your players do get so far as to start coming up with ways to beat the bad guy, there is a useful section at the end of the scenario devoted to potential plans that they might come up with, using lots of things my player never even discovered. They could use the CO2 stores, the bulldozer or forklift that was in the hold, etc.
The Appendix

In the Appendix, you get stats for the two NPCs and the Sciapod itself.
The NPC stats could be particularly useful if a player loses their PC early and they need a replacement. This did happen in my game but only after both NPCs were already dead so it didn’t help.
When it comes to stats for the Sciapod, I don’t think it should matter really. It is designed to be undefeatable by normal means. The PCs are supposed to have to come up with some big, brash, loud plan to kill it, after all. But there are elements to the creature that are of real interest. For instance, it is visible only to those who have silver touching skin for some reason. This proved to be a weird and scary element of the PCs encounters with the monster. It directly led to the death of one of them but it is a strange addition to the abilities of what is already an odd adversary. It is utterly silent too, and it wields this weird crystalline bow with enormous glass like arrows. This last bit feels very un-Cthulhu to me. It adds more of a D&D flavour to this monster but it did allow it to attack from a distance, which I made use of. This led to two memorable moments of gameplay, in fact. First, our pop-star character, Siren stood on the deck and had a showdown with the Sciapod, she with her little .22 pistol and it with its giant glass bow. Second, the creature launched one of its enormous arrows into the hull of the lifeboat they were escaping on right at the end, ushering in their deaths and the end of the game.
Conclusion
This was a fun one-shot/two-shot. It had great pre-generated characters and a fascinating premise and setting. (Although I have to stop running one-shots on boats. Apparently its become a trend…) But I question whether the monster that’s central to it is really Cthulhu-mythosy enough. It’s strange but not necessarily horrific in and of itself. Also, the adventure involved a lot of prep for something that could be designed to be run with little or no preparation. But you have to read the descriptions to familiarise yourself with the setting, the clues, the origin stories, hidden history etc, etc. and that all takes time.